

I started by adding little silver balls to wire as in these Ethnic Heart Earrings:

The process of soldering the balls to the hammered wire was quite a challenge and in the end they became fixed by a mixture of soldering and fusing. I do like the final look but realised that controlling the heat of my torch was very important to whether the balls or the wire ending up fusing together. This technique will need more practice!
Following on from the soldering/fusing idea, I then added pebbles to a ring as in these Pebble Trio Ring:

And more pebbles added to this Labradorite Pendant (love this gemstone!):

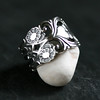
On to the next challenge... I wanted to create a frame of pebbles around a gemstone. Using labradorite again, I created this Pebble Frame Ring. NB. The cabochon in the photo is not yet set as I decided to wait until I know the final size of the ring:

And my most recent 'pebble' adventure was to hammer the balls before adding them to a jewellery piece. In this Aqua Chalcedony Pebble Framed Bangle, I used two different sized pebbles to create the frame around the bead:


.JPG)


I'm a pebble and ball fan too. Love your pieces and they look so neatly done :D
ReplyDeleteHi Tracy - sorry it's taken me so long to respond to your message, I'm a very bad blogger! Thank you for your regular feedback on my work. I hope all is good with you. Have you been making any exciting recently? Kristin :)
DeleteI too love the silver balls/pebbles (yes, that does sound nicer!), and find it quite magic the way the silver runs together to make the pebbles. It's also fun figuring out how much silver you need to make a particular size! I've been experimenting with adding pebbles to rings and pendants this year. I do love the hammered effect and the ring is just beautiful. Thanks for sharing and inspiring with your work!
ReplyDeleteThank you SMJ and great to hear from you, sorry it's taken me a while to reply. On the subject of balls, I haven't quite worked out the sizing of silver needed to make a certain size ball. I have so much scrap bits that I just make loads of balls and keep them in a pot for when they might be needed. I did see something on the web where a jewellery maker made lots of little 'granules' (posh word for balls!) and then filtered them through a shaker thing with different sized holes - oh, for the time or money to make/buy one of those? Happy days, Kristin :)
DeleteBeautiful work :) What looks so simple, can be so difficult, I know. The first time I tried soldering with beads, I felt like I was playing catch with them after the flux started bubbling. I had to mentally cross my fingers and hope for the best. )
ReplyDeleteHi Tela, great to hear from you, hope you and your family are keeping well. Sorry it's taken me a while to respond to your comment, I've been away from blogger for a while so need to catch up with my reading. Yes, you're right, it certainly does not seem the simplest thing to do working with balls (!). I saw on the web a jewellery designer (pretty sure it was the wonderful Soham Harrision) coated silver sheet in solder and melted it first, then placed the balls on top and reheated the piece. I tried that and it worked, although I then realised it is only a good solution for some pieces and not if you want to leave some of the silver sheet showing afterwards as it is no longer smooth and shiny. Hey ho, you live and learn. All the best, Kristin :)
Delete